Introduction
Solution patching is a very powerful feature in Microsoft Dynamics 365 when you are working on different phases for a project or working with multiple solution. In my experience, one of the complex things is to managing solution in Dynamics 365. Many people are struggling with managing their managed/unmanaged solution now days, believe me your life will become easy when you use Solution Patching.
Why Solution Patch is Required?
You may know there is two type of solution called managed and unmanaged. I am not going to details about those. In development environment we usually working on unmanaged solution and when we are moving the solution to another environment most of the time we are making it managed solution.
The problem starts here, every time you must deploy complete managed solution (For any changes of existing managed solution component) in your target instance (UAT), which means by unknowingly/unintentionally you are overwriting changes to your target instance(UAT). This creates problem when many people working on the same solution. You might not aware who did what, moreover you may need to do complete test after deployment, which need additional effort and time.
How do you manage solution Patch?
Before moving the actual topic, I would like to talk about versioning of the solution. Microsoft Dynamics 365 provides solution version number format which looks like 1.0.0.0. Where last two numbers define as minor version, and the first two numbers talks about major version. So how you can apply version number using patch?
In the Dynamics 365 there are two button “Clone To Patch” and “Clone Solution”. When you will do “Clone To Patch” that means you are creating minor version from your main solution which means you are creating a patch where you are going to change future task . Here you can see you can only change last two numbers for “Clone To Patch”.

Let’s assume you have an unmanaged solution called “Solution M” (version 1.0.0.0) which delivered in UAT as managed solution. Now you are moving to project next phase or you got some change request and now you must create a patch on top of unmanaged solution. Assume that you create solution “Patch A “with version 1.0.1.0 and “Patch B” with Version 1.0.2.0.
You can create number of patches as per your requirement and deploy only patches to the target instance. So in your DEV environment you have below solution.
- “Solution M” (Version: 1.0.0.0) [Main unmanaged in DEV]
- “Patch A” (Version: 1.0.1.0) [Unmanaged]
- “Patch B” (Version: 1.0.2.0) [Unmanaged]
And in your UAT instance you have all solution like above and those are managed.
- “Solution M” (Version: 1.0.0.0) [Main managed solution which delivered first to UAT]
- “Patch A” (Version: 1.0.1.0) [managed]
- “Patch B” (Version: 1.0.2.0) [managed]
You might be thinking it’s difficult to manage multiple solution again using solution patching. No it’s not like that and that’s why you have a button “Clone Solutions”.
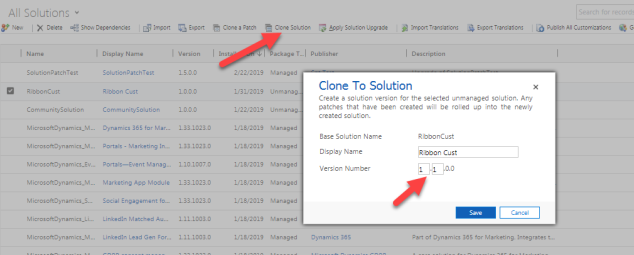
You should always do “Clone Solution” by selecting parent solution (Here our parent solutions “Solution M”) from where you have created the patches. So once you do “Clone solution” by selecting the parent solution (Solution M) all the patches will be merged with a new version of Solution. Let’s give the version no of new cloned solutions 2.0.0.0. Look below screenshot when you do “Clone Solution”, which means you are creating major version by merging all the patches and creating only one solution.
You will see only one solution in you DEV environment after doing “Clone Solution”. All solution will be automatically merged; you don’t need to manually handle them.
- “Solution M” (Version: 2.0.0.0) [Main unmanaged in DEV]
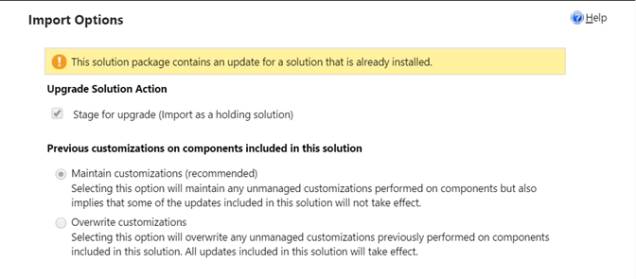
Now you might be thinking what happen when you deploy the cloned solution in the target instance (UAT). When you deploy new cloned Managed solution its automatically merge all the existing managed solution and you can see only one solution in your target instance. Make sure you choose following options at the time of import. [For major version/cloned solutions, this may be including deletion existing fields, entity from the solution which will apply to target instance.].
- Stage for Upgrade.
- Overwrite Customization.
Once solution import done don’t forget to do “Apply Solution Upgrade”. Once you click on apply solution upgrade which means you want to upgrade the solution as it is like DEV which is will also apply deletion of any component from the existing solution in your Target instance. This is one of the beauty part of the Solution cloning. Ideally if you don’t use Solution Clone, you will get the dependency error for importing managed solution. So now you don’t need to worry about that.
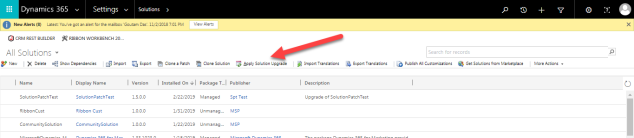
After doing “Apply Solution Upgrade”, don’t forget to do “Publish all customization”. You will see in your target instance (UAT), only one solution will be there.
- “Solution M” (Version: 2.0.0.0) [Managed solution in target instance (UAT ) after deploying cloned solution.]
Hope this helps J.
